The introductory chapter of this part outlined what is at stake, which is summarised in a dedicated course I gave with Romain Avouac (in French).
Scroll down to read the slides below or click here to display them full screen (the slides are in French).
This chapter is your opportunity to take your first steps with Git. The next chapter is devoted to collaborative work. To make learning easier, this chapter suggests using the Git extension of VSCode or JupyterLab. VSCode probably offers,
at the moment, the most complete extension. Some parts of this tutorial require the command line.
It is perfectly possible to complete this tutorial entirely from the command line.
However, for someone new to Git, a
graphical interface can be a valuable aid
to understanding and adopting Git. Once you are comfortable with
Git, you can easily do without graphical interfaces
for daily routines and only use them
for certain operations where they prove very handy
(notably comparing two files before having to merge them).
To understand the analogies with hand-made versioning, let us recall how it works with Figure 1

ImportantImportant
It is strongly recommended to use VSCode to learn Git. Its extension is very well done, much better than the Jupyter one.
Colab does not natively come with a Git extension. Automatic backups to Github are possible but this is not a practice to encourage. Even worse, Colab will rather offer an integration with Drive, another Google product. The notebook will indeed be versioned since Drive keeps version backups, but it is not a technology designed for code backups; it will not bring the benefits of Git that will be discussed later.
ENSAE students, and more generally everyone who can benefit from the SSPCloud infrastructure1,
have access to Python development environments with Git preinstalled and accessible through interfaces connected to IDEs. This notebook can be launched on this infrastructure using these buttons
If you are not eligible for the SSPCloud, the path to a ready-to-use environment for Git and Python is more winding. It is recommended to download and install VSCode and to add, at the very least, the Python extensions and GitLens. You can of course customise your development environment much further, but these are the minimal building blocks for a functional and ergonomic local environment.
1 Before starting: create a Github account and a working copy
The first step takes place on Github and consists in creating an account on this platform.
TipExercise 1a: Create a Github account
It is important to follow the instructions step by step, every step matters
- If you do not already have one, create an account on github.com
Log in at https://github.com > + (at the top of the page) > New repository > Fill in the “Repository name” > Tick “private” > “Create repository”
👉️ Repository: file tree whose history we want to keep in a common place.
TipExercise 2: create a repository on Github
- Create a repository following the instructions below.
- Create this repository as private, this will allow us to activate our token in exercise 3. You can make it public after exercise 3, it is up to you.
- Create this repository with a
README.mdby ticking theAdd a README filebox - Add a
.gitignoreby selecting thePythontemplate
2 Some Git basics
2.1 Remote version, local version
With the previous exercise, we created a first repository. It is a centralised repository that will serve as the source of truth for our project and through which the contributors to a project interact. But we have not yet discussed how to make it evolve; for that, we need to create working copies.
Git is a decentralised version control system2. This means that contributors edit files in their favourite editor and then submit them to update the source of truth, the remote repository.
👉️ Version control: practice of tracking and managing the changes made to a software project.
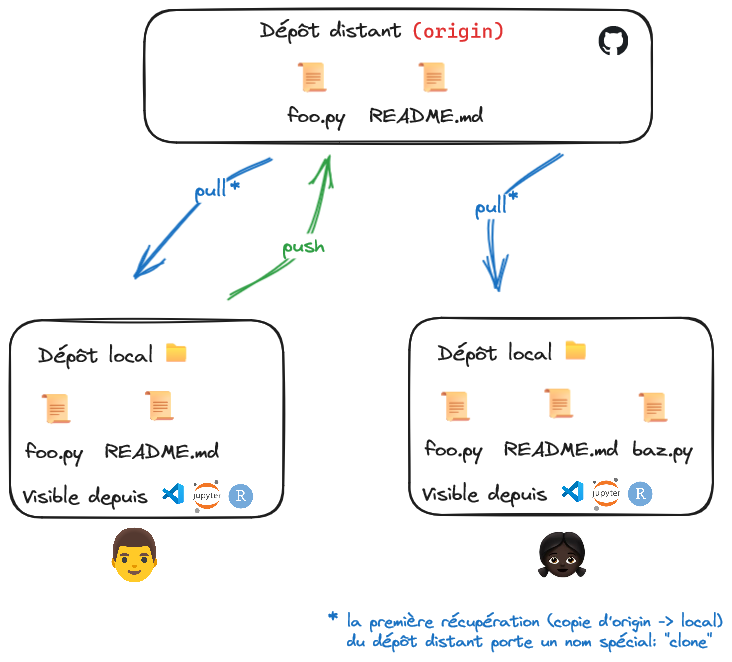
Git
We will come back to Figure 2.1 in more detail later, in particular to the many technical terms shown on it. But understanding this fundamental distinction between remote and local repositories was important in order to get started. A platform that stores remote repositories is called a forge. In this course, we will present Github but there are others, notably Gitlab.
👉️ Forge: collaborative management system for text or code.
Github and Gitlab are the two best-known forges but there are many others.We created our remote repository in the previous exercise. How do we create a working version? This operation is called cloning (git clone). The goal of the next exercise is to do this, but it first requires understanding the concept of authentication before we can start.
👉️
clone: retrieving a remote repository and its history by creating a local copyAlthough it is possible to use Git offline,
that is, pure local version control without a remote
repository, this is a rare
use with limited interest. The value of Git is
that it offers a robust and efficient way of interacting with a
remote repository, thereby facilitating collaboration, whether in a team or
alone.
TipWhy Github?
For these exercises, we suggest
using Github, the most visible forge.
The advantage of Github over its main competitor, Gitlab,
is that it is more visible, because it is
better indexed by Google and, partly for historical reasons, gathers more
Python and R developers (which matters in fields like
code where network externalities play a role).
Being familiar with the
Gitlab environment is still useful because many internal
software forges are built on the open-source features (the graphical interface
included) of Gitlab. It is therefore very useful to master
the core features of these two interfaces, which are in fact almost identical. Conveniently, this is the subject of this chapter and the next.
2.1.1 Authenticating to Github with a token: principle
👉️ Authentication: process allowing a computer system to make sure of the identity of whoever wants to perform an action.
Git is a decentralised version control system:
code is modified by each person on their own workstation,
then brought into line with the collective version available
on the remote repository whenever the contributor decides.
The forge therefore needs to know the identity of each
contributor, in order to determine who is the author of a change made
to the code stored in the remote repository.
For Github to recognise a user who proposes changes,
they must authenticate (a remote repository, even a public one, cannot be modified by just anyone). Authentication thus consists in providing something that only you and the forge are supposed to know: a password, a complicated key, an access token…
More precisely, there are two ways to make your identity known to Github:
- an HTTPS authentication (described here): authentication is done with a login and password or with a token (a complicated password automatically generated by
Githuband known only to the holder of theGithubaccount); - an SSH authentication: authentication is done with an encrypted key available on the workstation and known to
GitHuborGitLab. Once configured, this method no longer requires you to state your identity: the fingerprint that the key constitutes is enough to recognise a user. This is not the method we will apply here3.
NoteA note on two-factor authentication
Since August 2021, Github no longer allows password authentication
when interacting (pull/push) with a remote repository
(reasons here).
You must use a token (access token), which has the advantage
of being revocable (you can delete a token at any time if, for example,
you suspect it was leaked by mistake) and of having limited rights
(the token allows certain standard operations but
does not allow certain critical operations such as deleting
a repository).
GitHub will progressively require all GitHub users to enable one or more forms of two-factor authentication (2FA). For more information on the 2FA rollout, see this blog post. In practice, this means you will have to choose between:
- Providing your mobile phone number to validate some logins with a code you will receive by SMS;
- Installing an authentication app on your phone (e.g. Microsoft Authenticator) that will generate a QR code you can scan from GitHub, which does not require you to provide your phone number
- Using a USB security key
To choose between these options, go to Settings > Password and authentication > Enable two-factor authentication.
👉️ Two-factor authentication (2FA): security practice that authorises authentication only after two distinct proofs of identity have been presented to an authentication mechanism. For instance, in a banking app, providing a customer number and a code sent by SMS
2.1.2 Creating a token
👉️ Token authentication is a form of authentication that allows a user to access an online service, an application, or a website without having to enter their credentials again. Authentication tokens work like an entry ticket with limited validity: they grant continuous access for as long as they are valid. As soon as the user logs out or leaves the application, the token is invalidated.
The official documentation contains a number of screenshots explaining how to proceed. Keeping this documentation open in case of doubt, together with the instructions of the next exercise, we can create an authentication token.
TipExercise 3: Create a token
Follow the
official documentation, giving the token only the repo rights4.
To sum up, the steps should be as follows:
Settings (account) > Developers Settings > Personal Access Token > Tokens (classic) > Generate a new token (classic) > “MyToken” > Expiration “90 days” > tick only “repo” > Generate token > Copy it
⚠️ Keep the page open, the token only appears once and we have not yet made the effort to store it somewhere durable. That will be the subject of the next exercise. Do not worry, though, if you lost the token before you could save it: you can generate a new one by following the procedure above again.
We have created a token and, as indicated on the Github page or in the exercise instructions, it is not permanent. We therefore need to find a way to keep it somewhere. We will suggest several solutions. Writing it in a text file created with a notepad is not one of them; on the contrary, it is a very bad practice.
ImportantImportant
It is important never to store a token, let alone your password, in a project.
It is possible to store a password or token in a secure and durable way
with the Git credential helper. It is presented later on.
If it is not possible to use the Git credential helper, a password
or token can be stored securely in
a password manager such as Keepass.
Never store a Github token, or worse a password, in an unencrypted
text file. Password managers
(such as Keepass, recommended by ANSSI, the French national cybersecurity agency)
are easy
to use and only keep on the computer a
hashed version of the password that can only be decrypted with a password
known to you alone.
TipExercise 3bis: store your token (for SSPCloud users)
The SSPCloud offers a token storage service that can then easily be used to authenticate to Github when using VSCode or Jupyter.
- Copy the token displayed on the
Githubpage you opened earlier. Do not select the characters by hand, use the dedicated copy button () - Click on the “My Account” section of the
SSPCloud(Mon Compte if the interface is in French). Go to theGittab and paste the value you copied.
You can stop at this point, we will use this token in the next exercise.
TipExercise 3ter: store your token (for people without SSPCloud access)
The recommended solution is to store your token in a password manager such as Keepass (recommended by ANSSI). It is software that stores, in encrypted form, the passwords kept in it, following the logic of a digital safe.
Beyond the benefit of storing a Github token for this course, such software is very handy day to day and secures access to sensitive digital services. It also includes strong password generators that reduce the risk of digital identity theft by making techniques like brute-force attacks almost impossible.
Now that we have stored our token in a secure place, we can move on to the next step, which is to retrieve our remote repository into a working copy, an operation that will lead us to actually use the token we set aside for now.
TipExercise 4a: create a service and understand the principle of cloning and authentication (SSPCloud users)
On the SSPCloud, go to the My Services page (Mes Services if the interface is in French).
Click on
➕ New service(Nouveau service) and choose avscode-pythonservice (do not pick another one).Keep the default parameters and launch the service.
Once the service is ready, click on the button “Click to copy the service password” (Cliquez pour copier le mot de passe du service). This will store the service password (randomly generated, it has nothing to do with your general
SSPCloudpassword) in the clipboard. This password is also visible in plain text in the part that is blacked out in Figure 2.2.
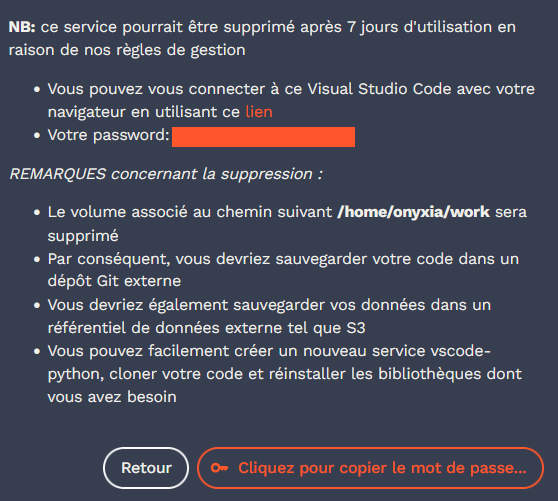
Paste this password into the
Passwordfield that appears when you open the service.In another tab, retrieve, from the home page of your repository, the URL of the remote repository, which is available by clicking on the green
<> Codebutton on the right. The URL has the following form
https://github.com/<username>/<reponame>.git
- Open the terminal (
☰ > Terminal > New Terminal) and start typing
git clone # paste your url of the form https://github.com/<username>/<reponame>.gitto paste your URL after it; if CTRL+V is blocked by the browser, you can use SHIFT+Insert. Press Enter.
A page will open: “The extension ‘GitHub’ wants to sign in using GitHub”. Refuse by clicking on “Cancel” (the optional questions show what happens when you accept: you switch to another authentication mode).
In the window at the top, type your username first. Then, when it asks for your password, paste your token, not your
Githubpassword (if you still have theGithubpage open, copy it from there, otherwise go back to the My account page of theSSPCloud)Observe the update of the file explorer in
VSCode: yourREADMEand your.gitignore, which are visible onGithub, should now be there.Type
cd my-little-projectassuming the folder of your repository is calledmy-little-project. Then typegit remote -v, a command that asksGitwhereorigin, your remote repository, points. The answer should be the URL you entered previously
This was a necessary illustration to understand the principle of authentication. The next exercise (4b) will suggest a more direct way of working, which is useful to know because it will save you from having to authenticate at each interaction with the remote repository.
Optionally, to understand the difference with the delegated authentication offered by VSCode, you can follow these optional instructions:
Still in the same VSCode, open a new terminal (
☰ > Terminal > New Terminal)Type
git clone https://github.com/<username>/<reponame>.git repo-bis, replacinghttps://github.com/<username>/<reponame>.gitwith the URL of your repository. This will clone your repository into therepo-bisfolder once you are actually authenticated.This time, accept the delegated authentication offered by VSCode. It is a two-factor authentication:
- The first authentication factor is the code that
Githubasks you to copy and to enter in the page thatVSCodewants to open (you have to accept to copy it and to open the page). Paste this 8-character code, validate and accept the rights requested by the application. - The second factor is the code from your authentication app (for example
Google Authenticator, or the one you receive by SMS). Enter it and validate, and the clone should start
- The first authentication factor is the code that
This exercise has just illustrated the principle of authentication and the way VSCode can attest to your identity thanks to a token or to two-factor authentication. The next exercise suggests a token authentication method that is a bit more practical than the one we implemented ☝️.
TipExercise 4b: create a service and understand the principle of cloning and authentication (SSPCloud users)
This approach shows how the SSPCloud injects the token and the repository you want to clone when a VSCode service is created.
On the SSPCloud, go to the My Services page. You can delete the existing service, it is no longer needed.
Click on
➕ New serviceand choose avscode-pythonservice (do not pick another one).
- In another tab, retrieve, from the home page of your repository, the URL of the remote repository, which is available by clicking on the green
<> Codebutton on the right. The URL has the following form
https://github.com/<username>/<reponame>.git
Unfold the
Vscode-python configurationmenu (Configuration Vscode-python) and look for theGittabIn it, you should see your token pre-injected in the form. Do not change it.
In another tab, retrieve, from the home page of your repository, the URL of the remote repository, which is available by clicking on the green
<> Codebutton on the right. The URL has the following form
https://github.com/<username>/<reponame>.git
You can use the icon on the right to copy the URL.
Paste it into the
Repositoryfield of the service creation form on theSSPCloud. Launch the service and wait for it to be created (about twenty seconds).The clone of the remote repository should be visible in the file tree.
Open the terminal (
☰ > Terminal > New Terminal) and typegit remote -v, a command that asksGitwhereorigin, your remote repository, points. The answer takes the form:
https://ghp_XXXX@github.com/username/repository.gitwhich differs from the URL you entered in the Git tab.
As you can see with this method, the token is in plain text. This is why tokens are used rather than passwords:
if they are revealed, they can always be revoked, which avoids
problems
TipAlternative exercise 4: when you do not have an SSPCloud account
The procedure is very similar. In practice, the only difference is that there is no need to create a new service since a VSCode installation already exists.
- In your browser, retrieve, from the home page of your repository, the URL of the remote repository, which is available by clicking on the green
<> Codebutton on the right. The URL has the following form
https://github.com/<username>/<reponame>.git
- Open the terminal (
Terminal > New Terminal) and start typing
git cloneand paste the value you copied earlier. Do not press Enter yet. With the arrow keys, move between https:// and github.com. Retrieve your Github token from your browser or from Keepass. Paste it then add @. This should give
https://ghp_XXXX@github.com/username/repository.gitWhich, all in all, gives
git clone https://ghp_XXXX@github.com/username/repository.git- The clone of the remote repository should be visible in the file tree.
As you can see with this method, the token is in plain text. This is why tokens are used rather than passwords: if they are revealed, they can always be revoked, which avoids problems
2.2 The staging area
👉️ Staging area:
Git’s waiting area before new changes are validated into a file’s history.In a world without Git, you write code, save your script and sometimes decide that this version is worth treating as one you can start over from. With Git it is the same thing, except that the principle is formalised more cleanly.
The first conceptual level is the index of changes. These are the changes awaiting validation, hence the name staging area in the first part of Figure 2.3.
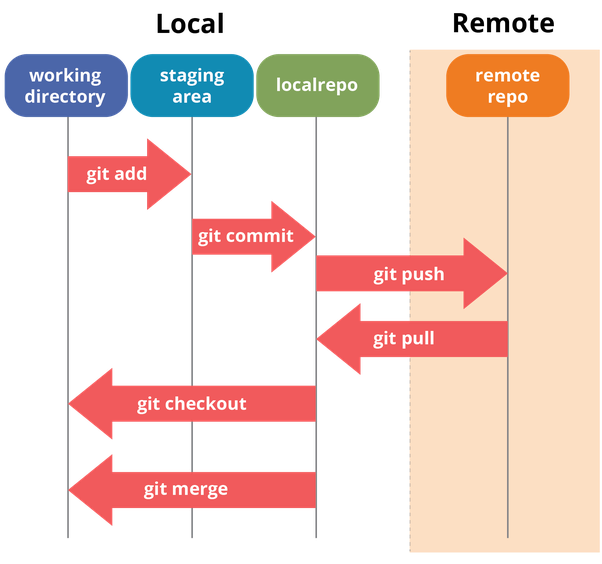
Git workout
In principle, when you edit scripts or notebooks, you save them regularly. The next level of commitment is to set aside a particular version of them, which by hand (see Figure 1) we would do by duplicating the file. This means putting one or more changes in the waiting list of changes to be validated. This operation is called git add and is the subject of the next exercise.
TipExercise 5: Stage changes
Create a 📁
scriptsfolder in the folder of your repository. InVSCode, you can use the appropriate icons.Create the files
script1.pyandscript2.pyin it, each containing a fewPythoncommands of your choice (the content of these files does not matter).Go to the
Gitextension ofVSCode. You should find a panel that looks like this


On the command line, this is the equivalent of
git status- In
VSCode, a+button appears to the right of the name of the filesscript1.pyandscript2.py. InJupyter, when you hover your mouse over the names of the filesscript1.pyandscript2.py, you should see a+appear. Click on it.
If you had preferred the command line, what you did is equivalent to:
git add scripts/script1.py
git add scripts/script2.py- Observe the change in the file’s status after clicking on
+. It is now in theStagedsection.
Basically, you have just told Git that you are going to make a change to the file
public, but you have not done it yet (Staged is a waiting list).
If you were on the command line, you would get this result after a git status
On branch main

No commits yet

Changes to be committed:
  (use "git rm --cached <file>..." to unstage)
        new file:   .gitignore
The new changes (in this case the creation of the file and the validation of its current content)
are not yet archived. For that, we will need to make a
commit (we commit ourselves by making a change public).
Modify the content of an existing line in the
README.mdand go through the same staging routine.Let us look at the changes we are about to validate. To do so, hover over the name of the file
README.mdand click on it. A page opens and puts the previous version side by side with the new one, with additions in green and deletions in red. We will find this visualisation again with theGithubinterface, later.
If you do the same for scripts/script1.py, since the file did not exist, we normally only have
additions.
It is also possible to do this with the command line but it is
much less convenient. The command to call is git diff and
you need to use the cached option to tell it to inspect the
files for which we have not yet made a commit. Changes will appear in green
and deletions in red but, this time,
the results are not shown side by side, which is much less
convenient.
git diff --cached2.3 The commit
At this stage, we have configured Git so that it can
authenticate automatically and we have cloned the repository to get a
local working copy. We made changes and put them in the waiting queue of our version control system. All that remains is to finalise the work.
As a reminder, Figure 2.3 illustrated the routine for making the history of your project evolve. After adding to the queue (the staging area), you validate the changes with a commit. As its name suggests, it is a change proposal to which we, in a way, commit ourselves.
👉️ Commit: Record of the evolution of a file. It is the fundamental unit of time in
Git.A commit has a title and optionally a description. To this
information, Git will automatically add a few additional
elements, notably the author of the commit (to identify the person
who proposed this change) and the timestamp (to identify when
this change was proposed). This information makes it possible to identify
the commit uniquely, and a unique random identifier
(a SHA number) is added to it, which makes it possible to refer to it without
ambiguity.
The title is important because it is, for a human, the entry point into the history of a repository (see for example the history of this course’s repository). Vague titles (File update, Update…) should be banned because they require needless effort to understand which files were modified.
Do not forget that your first collaborator is your future self who, in a few weeks, will not remember what the Update commit of 12 January was about and how it differs from the Update of 13 March.
TipExercise 5: first commit (at last!)
In VSCode, on the contrary, you have to look at the top.

On the Jupyter interface
In Jupyter, conversely, everything happens in the lower part of the graphical interface.

1️⃣ Enter the title Create the first scripts 🎉 and add the description
Files in the scripts folder.
In VSCode, the title of the commit corresponds to the
first line of the commit message; the following lines, after a line break, correspond to the
description.
2️⃣ Click on Commit. The file has disappeared from the list, this is normal:
it no longer has any change to validate. To find it again in the list
of Changed files, you will have to modify it again
3️⃣ You should see the lifeline of your project grow longer. You can click on the commit to find the changes you validated
NoteNote
If you were using the command line, the equivalent way of doing this would be
git commit -m "Initial commit" -m "Create the first files 🎉"The m option creates a message, which will be available to all
contributors of the project. On the command line, this is not always
very convenient. Graphical interfaces allow for more
developed messages (good practice is to write a commit message like a
succinct email: a title and a little explanation, if needed).
2.4 The .gitignore file
When using Git, there are files you do not want to share
or whose changes you do not want to track (typically large databases).
It is the .gitignore file
that manages the files excluded from version control.
When creating the project on GitHub, we asked for a .gitignore file to be created, located at the root of the project. It specifies all the files that will always be excluded from Git’s indexing.
👉️
.gitignore: file storing a set of rules for files that must not be tracked by Git.
TipExercise 6: the .gitignore file
1️⃣ Open the .gitignore file and look at
some of the rules written in it
Display this file when using Jupyter
By default, the .gitignore file is not displayed because
.* files are configuration files. You need to enable
an option to display it. At the very top
of Jupyter, click on View -> Show Hidden Files
2️⃣ Create a data folder at the root of the project and, inside it, create a file data/raw.csv with any line of data. Look at the Git tab and notice that the file appears among the changes to be validated. Do not add this file to the staging area nor commit it.
3️⃣ Add the line data/ to the .gitignore (it is an editable text file), do not forget to save. Go back to the Git tab and observe the change. Do you understand what is happening?
4️⃣ Create a file raw2.csv at the root and a file data/read_data.py with a line of Python code (the content of the file does not matter).
5️⃣ Go back to the Git tab and observe the change in your repository.
The .gitignore should not be neglected.
Git is a version control system designed for text files, not data files. Unlike text files, where Git can track changes line by line, which makes it a useful version manager, data files are too complex for this fine-grained tracking, so every change to these files, which are often heavy (several megabytes), amounts to duplicating the file in Git’s memory (more details on the alternatives in Tip 2.1).
Besides this technical reason for wanting to exclude data files from version control, do not forget that the data used by data scientists is often confidential, collected for well-defined purposes or of strategic interest that disclosure to competitors could weaken. Sharing data with the whole world can be very costly under the GDPR, whose fines can reach 4% of worldwide turnover.
This .gitignore file thus acts as a safeguard. It is useful to be conservative with it, even if it means allowing exceptions, case by case and consciously. For this reason, it is recommended to add many classic data extensions to it: *.xlsx, *.csv, *.parquet…
Tip 2.1: If data does not go on Github, where should it be stored?
It is more relevant to store data in ad hoc environments. For this, the state of the art in cloud technologies is to use a specialised storage system that follows a protocol called S3. It was originally developed by Amazon for its commercial AWS cloud before being made open source. This makes it possible to have cloud infrastructures that use this technology independently of Amazon.
Github admittedly seems convenient for storing data. But there is no such thing as a free lunch. This first has an environmental cost: Git, and a fortiori Github, are not database storage systems, so they do not optimise the storage of data. We should avoid increasing the carbon footprint of digital technology, already growing (Arcep 2019), any more than necessary through digital waste. Then, this choice, originally convenient, often proves costly in the long run. If the data archived with Git changes frequently, the unavoidable duplication it implies will make the volume of the repository explode. Beyond a certain threshold, you will have to switch to complex solutions such as Git large file storage (LFS), which is clearly avoidable with discipline. In contrast, with storage systems designed for data, such as the S3 protocol, storing and processing data are optimised. This is what distinguishes data storage systems like S3 from other storage systems designed for files, regardless of their format, like Drive, which is not suited to the needs of data scientists.
Storing data is expensive for cloud providers and it is no surprise that they rarely offer free plans for large volumes. SSPCloud users benefit from a storage system attached to the platform and following the S3 protocol. More details in the dedicated chapter and in the ENSAE 3rd-year course Putting data science projects into production (in French).
3 First interactions with Github from your working copy
So far, after cloning the repository, we have worked only
on our local copy. We have not tried to interact again
with Github.
It is perfectly possible to do version control without setting up a remote repository. However,
- it is dangerous since the remote repository acts as a backup of a project. Without a remote repository, you can lose everything if there is a problem with the local working copy;
- it means choosing to be less efficient because, as we will show, the
features of the
GithubandGitlabplatforms are also very beneficial when working alone.
Interacting with the remote repository consists in retrieving what is new on it or sending our latest changes to this central repository. In practice, we can therefore summarise 95% of daily Git practice in three words:
commit: I validate the changes I made locally with a message explaining thempull: I retrieve the latest version of the code from the remote repository (an operation calledfetch) and merge it with my changes, if I made any (an operation calledmerge)push: I send my validated changes to the remote repository
We have already seen the first one, we will now see the two new terms.
Before that, we can come back to a command already mentioned, git remote -v. The remote repository is called a remote in Git language. The -v option (verbose)
lists the remote repository(ies).
By opening a terminal in VSCode and typing git remote -v in it, you should get a result similar to this one:
origin  https://<PAT>@github.com/<username>/<projectname>.git (fetch)
origin  https://<PAT>@github.com/<username>/<projectname>.git (push)
Several pieces of information are interesting in this result. First, we
find the url we gave to Git during the cloning operation. Then, we notice a term origin. It is an alias
for the url that follows. It saves us from having to type the whole
url every time, which can be tedious and error-prone.
fetch and push
are there to tell us that we retrieve (fetch) changes from
origin but also send (push) changes to
it. Generally, the urls of these two repositories are the same but it can
happen, when contributing to open-source projects that we did not create,
that they differ. This will be explained in the next chapter when we tackle the subject of collaboration.
3.1 Sending changes to the remote repository (push)
TipExercise 7: Interact with Github
We now need to send the files to the remote repository.
1️⃣ If you have not already done so, add the rule *.csv to your .gitignore. With the graphical interface, add all pending files to the index (git add) and make a commit (git commit).
2️⃣ Click on the Sync changes button
The equivalent of these two steps on the command line would be:
- This means: “git sends (
push) my changes on themainbranch (the branch we worked on, we will come back to it) to my repository (aliasorigin)”
3.2 Retrieving changes from the remote repository (pull)
The second way of interacting with the repository is to retrieve
results available online onto your working copy. This is called
pull.
For now, you are alone on the repository. There is therefore no
partner to modify a file in the remote repository. We will simulate this
case by using the Github graphical interface to modify
files. We will bring the results back locally in a second step.
TipExercise 8: Bring changes back locally
1️⃣ Go to your repository from the https://github.com interface
- Go to the
README.mdfile and click on theEdit this filebutton, which looks like a pencil icon.
2️⃣ Change the title of the README.md. Skip a line at the end of your file and enter the text you want, without punctuation. For example,
the oak one day said to the reed3️⃣ Click on the Preview tab to see the text formatted in Markdown
4️⃣ Write a title and an additional message to make the commit. Keep
the default option Commit directly to the main branch
5️⃣ Edit the README again by clicking on the pencil just above
the display of the README content.
Add a second sentence and fix the punctuation of the first one. Write a commit message and validate.
The Oak one day said to the Reed:
You have good reason to accuse Nature
6️⃣ Above the file tree, you should see the title of the last commit. You can click on it to see the change you made.
7️⃣ The results are on the remote repository but are not in your
working folder in Jupyter or VSCode. You need to re-synchronise your local copy
with the remote repository:
- In
VSCode, simply click on... > Pullnext to the button that lets you view the Git graph. - With the
Jupyterinterface, if possible, simply press the small down arrow, the one that now has the orange badge. - If this arrow is not available or if you work in another environment, you can use the command line and type
- This means: “git retrieves (
pull) the changes on themainbranch to my repository (aliasorigin)”
8️⃣ Look at the commit history again. Click on the
last commit and display the changes on the file. You can
notice how fine-grained version control is: Git detects, within
the first line of your text, that you added capital letters
or punctuation.
The pull operation allows:
- Your local system to check for changes on the remote repository
that you have not made (this operation is called
fetch) - To merge them if there is no version conflict or if the version conflicts can be merged automatically (two modifications of a file that do not affect the same location).
4 Branches
So far, we have made our history evolve linearly, without taking any risk. This is already very reassuring since we can always recover a past state of the code. But what should we do when we want to make substantial changes, involving several intermediate steps that are each meant to be a commit, without the risk of destabilising the version we were, until now, happy with?
Git offers an extremely convenient system for this: branches. A branch is a parallel version of the project that coexists with the main version, on main. This means that with Git, the same file can coexist in several different versions, which is fertile ground for experimentation. One version is active (the active branch) but the others remain available and can be activated if needed.
You can see the history of Git as a refined tree. The main branch is the trunk. The other branches start from this trunk and diverge. The trunk may very well evolve in parallel to these branches. The Git tree is nevertheless special, somewhat gnarled: branches can come back and merge with the trunk. We will see this in a more illustrated way in the next exercise and in the next chapter since it is one of the foundations of collaborative work with Git.
Here are a few examples where branches are used for significant work:
- you work alone on a task that will take you several hours or days of work (you must not push unfinished work to
main); - you are working on a new feature and you would like to collect the opinion of your collaborators before modifying
main; - you are not sure you will succeed in your changes on the first attempt and prefer to run tests in parallel.
It is common, in a collaborative setting, to use branches lavishly. As we will see in the next chapter, this can indeed save precious time if the project organisation is poorly defined. However, branches are not a magic cure because managing them requires rigour and can lead to disorganisation without it. Git is a technical solution that smooths organisation but, when roles are poorly defined, it will quickly reveal the problems without offering the solution unless you put some thought into how work is organised.
CautionCaution
Branches are not personal: just because you created a branch does not mean that one of the people collaborating with you on the Git project will not be able to modify it.
Using branches is already an advanced feature of Git. It is a wonderful technical tool but it does not solve organisational problems. On the contrary, with Git, they will show up much faster. Git is really the minimal foundation of good practices, a tool that will push you to always work better.
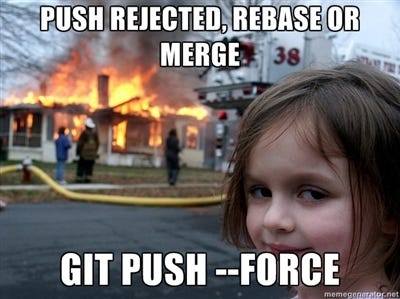
Among the practices that are technically possible but not recommended, you must absolutely ban the use of push force, which can destabilise collaborators’ local copies. If a push force is necessary, it means there is a problem in the branch, which must be identified and fixed without a push force.
Branches are generally associated with the issues system on Github. Issues are not native Git features but are provided by Github, which aims to simplify project tracking and feedback from other collaborators or users of a project.
Issues can be seen as a discussion system where people interested in the project can exchange. The advantage of using this through Github rather than an email loop is that it centralises, in the same place as the code, the exchanges and documentation useful for its evolution. The purpose of issues is very broad: they can be used to discuss new features that will eventually not be implemented, report bugs, share out the work, etc. Intensive use of issues, with appropriate labels, can even make project management tools like Trello unnecessary.
The next exercise aims to illustrate the principle of branches by making up an example of a request going through an issue and proposing a new feature in the project.
TipExercise 9: Create a new branch and merge it into main
1️⃣ Open an issue on Github (see the explanations above on the principle of issues). Point out that it would be nice to add a cat emoji to the README. On the right-hand side, click on the small cog next to Label and click on Edit Labels. Create a Markdown label. Normally, the label has been added.
2️⃣ Go back to your local repository. You will create a branch named
issue-1
How to do it in VSCode?
In VSCode, click on VSCode?... > Branch > Create Branch and enter the name issue-1.
How to do it in Jupyter?
Jupyter?With the JupyterLab graphical interface, click on Current Branch - Main
then on the New Branch button. Enter issue-1 as the branch name
(the branch must be created from main, which is normally the default
choice) and click on Create Branch.
How to do it on the command line?
If you are not using the graphical interface but the command line, the equivalent way of doing it is
- The
checkoutcommand is a Swiss Army knife of branch management inGit. It lets you switch from one branch to another, but also create branches, etc.
3️⃣ Open README.md and add a cat emoji (🐱) after the title.
Make a commit by redoing the steps seen in the previous
exercises. Do not forget, it is done in two steps:
- Add the changes to the index by moving the
READMEfile to theStagedsection - Validate the changes with a
commit
If you use the command line, this will give:
git add .
git commit -m "add cat emoji"
4️⃣ Make a second commit to add a koala emoji (:koala:) then
push the local changes:
+ In VSCode, click on the Publish Branch button.
+ Otherwise, if you use the command line, you will have to type git push origin issue-1
5️⃣ In Github, you should see
issue-1 had recent pushes XX minutes ago.
Click on Compare & Pull Request. Give your pull request an informative title.
In the message below, type
- close #1
The dash is a little trick so that Github
replaces the issue number with its title.
Click on Create Pull Request but
do not validate the merge, we will do it in a second step.
Having put a close message followed by an issue number #1
will automatically close issue 1 when you do the merge.
In the meantime, you have created a link between the issue and the pull request
While you are at it, you can add the Markdown label on the right.
6️⃣ Locally, go back to main. In the Jupyter interface, just
click on main in the list of branches. In VSCode, the list of branches
appears when you click on the name of the current branch (issue-1 in theory at this stage).
If you are on the command line, you need to run
git checkout maincheckout is a Git command that lets you navigate from one branch to another
(or even from one commit to another).
Add a sentence after your text in the README.md
(do not touch the title!). You can notice that the emojis
are not in the title, this is normal, you have not merged the versions yet
7️⃣ Make a commit and a push. On the command line, this gives
git add .
git commit -m "add a third line"
git push origin main
8️⃣ On Github, click on Insights at the top of the repository then, on the left, on Network (this is only
possible if you made your repository public).
You should see the tree structure of your repository appear. You can see issue-1 as a ramification and main as the trunk.
The goal is now to bring the changes made in issue-1 into the main branch. Go back to the Pull Requests tab. There, change the type of merge to Squash and Merge, as below (a small piece of advice: always choose this merge method).
Once this is done, you can go back to Insights then Network to check that everything went as planned.

9️⃣ Delete the branch (branch > delete this branch). Since it is merged, it will no longer be needed. Keeping it risks leading to unintended pushes on it.
TipTip
The Squash and Merge option combines all the commits of a branch (potentially very numerous) into a single one in the target branch. On large projects, this avoids branches with thousands of commits.
I recommend always using this technique and not the others.
To disable the other techniques, you can go to
Settings and, in the Merge button section, keep only the
Allow squash merging method checked
We now have all the basics needed to move on to the next step in our Git journey: collaborative work. Nevertheless, Git should not be used only in collective projects. Even when working alone, the quality gains from using Git are unmatched.
5 Additional case studies
The previous exercises follow a guided path on a real Github repository. The case studies below are complementary: they run directly on this web page5, reproducing the behaviour of a command line. This way, you can experiment without fear: the Undo button cancels the last command, and Reset brings the exercise back to its initial state.
The expected steps are ticked automatically when you reach the expected state.
The bottom panel is updated after each command: Files (working directory, staging area, repository), Changes (what has changed since the last commit) and History (the graph of commits).
5.1 Case study 1: git add freezes a version, not a file
In exercise 5, we added files to the staging area and then made a commit without touching the file in between. But what happens if we modify the file again after staging it?
TipCase study 1: modifying a file after git add
We are in a situation where a file (analysis.py) is already tracked by Git and versioned.
- Add a line to
analysis.pythen stage the file withgit add. - Add a second line without staging again, then run
git status. What do you notice? Also look at theFilespanel. - Make a commit then run
git statusagain. - Finish by committing the second change.
Try this case study with the interface below.
Loading the Git sandbox…
The file appears in two categories at the same time:
Changes to be committed(the version staged withgit add)Changes not staged for commit(the more recent version, in the working directory).
The commit only records the first one. This mechanism explains why we run git status before making a commit: it avoids forgetting changes, or sending changes we thought we had validated.
5.2 Case study 2: abandoning an experiment
In exercise 9, the issue-1 branch is merged into main. But a branch is also made to try things out: if the experiment leads nowhere, you abandon the branch and main was never touched.
TipCase study 2: a disposable branch
You want to test a LightGBM model without the risk of destabilising main.
- Create the branch
lightgbm-trialand switch to it (git checkout -b lightgbm-trial). - Create a file
lightgbm.pyand make two commits on this branch. - Go back to
mainwithgit checkout mainand check withlsthatlightgbm.pyno longer exists. - The experiment is not conclusive: delete the branch with
git branch -D lightgbm-trial. Look at theHistorypanel.
Try this case study with the interface below.
Loading the Git sandbox…
5.3 Case study 3: an urgent fix in the middle of a work in progress
Here is a frequent case, even when working alone: you are in the middle of a work branch and you notice a problem that needs to be fixed right away on main. The two lifelines diverge, and then you bring them back together.
TipCase study 3: fixing main along the way
You are on the plot branch, which is half finished. You notice a typo in the title of the README.md (“forcast” instead of “forecast”).
- Switch to
main(git checkout main), fix the title of theREADME.mdand make a commit. - Go back to
plotand add a commit to keep the work going. - Return to
mainand merge the branch withgit merge plot. - Look at the
Historypanel: what does the hollow circle represent?
Try this case study with the interface below.
Loading the Git sandbox…
To compare with exercise 9: here the merge is done locally and keeps all the commits of the branch, plus the merge commit. This is what the Squash and merge option of Github replaces: it condenses everything into a single commit and gives a more readable history.
Informations additionnelles
NotePython environment
This site was built automatically through a Github action using the Quarto
The environment used to obtain the results is reproducible via uv. The pyproject.toml file used to build this environment is available on the linogaliana/python-datascientist repository
pyproject.toml
[project]
name = "python-datascientist"
version = "0.1.0"
description = "Source code for Lino Galiana's Python for data science course"
readme = "README.md"
requires-python = ">=3.13,<3.14"
dependencies = [
    "altair>=6.0.0",
    "cartiflette>=0.2",
    "contextily==1.6.2",
    "duckdb>=0.10.1",
    "folium>=0.19.6",
    "gdal==3.11.4",
    "graphviz==0.20.3",
    "great-tables>=0.12.0",
    "gt-extras>=0.0.8",
    "ipykernel>=6.29.5",
    "jupyter>=1.1.1",
    "jupyter-cache>=1.0.0",
    "kaleido>=0.2.1",
    "langchain-community>=0.3.27",
    "loguru==0.7.3",
    "markdown>=3.8",
    "nbclient>=0.10.0",
    "nbformat>=5.10.4",
    "nltk>=3.9.1",
    "openpyxl>=3.1.5",
    "pandas>=3.0",
    "pip>=25.1.1",
    "plotly>=6.1.2",
    "plotnine>=0.15",
    "polars>=1.8.2",
    "py7zr>=1.1.3",
    "pyarrow>=17.0.0",
    "pynsee>=0.1.8",
    "python-dotenv>=1.0.1",
    "python-frontmatter>=1.1.0",
    "pywaffle>=1.1.1",
    "requests>=2.32.3",
    "scikit-image>=0.24.0",
    "scikit-learn>=1.8.0",
    "scipy>=1.13.0",
    "seaborn>=0.13.2",
    "selenium<4.39.0",
    "spacy>=3.8.4",
    "webdriver-manager>=4.0.2",
    "wordcloud==1.9.3",
]

[tool.uv.sources]
gdal = [
  { index = "gdal-wheels", marker = "sys_platform == 'linux'" },
  { index = "geospatial_wheels", marker = "sys_platform == 'win32'" },
]

[[tool.uv.index]]
name = "geospatial_wheels"
url = "https://nathanjmcdougall.github.io/geospatial-wheels-index/"
explicit = true

[[tool.uv.index]]
name = "gdal-wheels"
url = "https://gitlab.com/api/v4/projects/61637378/packages/pypi/simple"
explicit = true

[dependency-groups]
dev = [
    "nb-clean>=4.0.1",
]
To use exactly the same environment (version of Python and packages), please refer to the documentation for uv.
NoteFile history
| SHA | Date | Author | Description |
|---|---|---|---|
| 345804e7 | 2026-09-26 09:17:19 | Lino Galiana | Création d’un PDF avec typst (#703) |
| 255552d7 | 2026-09-22 11:49:40 | Lino Galiana | Reprise des exos de Git (#705) |
| 664cd3fe | 2026-09-20 15:58:53 | linogaliana | Joli visualisation de l’histoire d’un fichier |
| d6a2aae2 | 2026-09-19 19:47:00 | linogaliana | Modularize and translate Git chapter |
| 19ce4485 | 2026-09-19 19:19:48 | linogaliana | Modularise le chapitre Git |
| fe573ec0 | 2025-12-23 12:54:11 | Lino Galiana | Un syllabus sous la forme d’un joli tableau (#667) |
| 7b32fb5f | 2025-07-29 15:21:53 | Nicolas Toulemonde | Fixing small bugs on into git (#622) |
| 99ab48b0 | 2025-07-25 18:50:15 | Lino Galiana | Utilisation des callout classiques pour les box notes and co (#629) |
| 94648290 | 2025-07-22 18:57:48 | Lino Galiana | Fix boxes now that it is better supported by jupyter (#628) |
| e182c9a7 | 2025-01-13 23:03:24 | Lino Galiana | Finalisation nouvelle version chapitre API (#586) |
| 1202a02c | 2024-10-22 11:25:10 | Lino Galiana | Git, modifs suite au cours de 2024 (#568) |
| 6ff0f634 | 2024-10-22 06:54:44 | lgaliana | Numéro exo |
| 3a3b18a6 | 2024-10-22 06:52:52 | lgaliana | Emoji chat pour de vrai |
| 20672a4b | 2024-10-11 13:11:20 | Lino Galiana | Quelques correctifs supplémentaires sur Git et mercator (#566) |
| c326488c | 2024-10-10 14:31:57 | Romain Avouac | Various fixes (#565) |
| be1dd6e9 | 2024-10-01 13:49:35 | Lino Galiana | Solve problem with english badges + few bug solved (#560) |
| 21db4dbf | 2024-09-30 11:42:26 | lgaliana | Marges |
| 3e04253c | 2024-09-30 10:11:32 | Lino Galiana | Grosse mise à jour de la partie Git (#557) |
| 580cba77 | 2024-08-07 18:59:35 | Lino Galiana | Multilingual version as quarto profile (#533) |
| c9f9f8a7 | 2024-04-24 15:09:35 | Lino Galiana | Dark mode and CSS improvements (#494) |
| 005d89b8 | 2023-12-20 17:23:04 | Lino Galiana | Finalise l’affichage des statistiques Git (#478) |
| 4c1c22d5 | 2023-12-10 11:50:56 | Lino Galiana | Badge en javascript plutôt (#469) |
| 09654c71 | 2023-11-14 15:16:44 | Antoine Palazzolo | Suggestions Git & Visualisation (#449) |
| e3f1ef10 | 2023-11-13 11:53:50 | Thomas Faria | Relecture git (#448) |
| 1229936e | 2023-11-10 11:02:28 | linogaliana | gitignore |
| 57f108fa | 2023-11-10 10:59:36 | linogaliana | Intro git |
| 9366e8d2 | 2023-10-09 12:06:23 | Lino Galiana | Retrait des box hugo sur l’exo git (#428) |
| a7711832 | 2023-10-09 11:27:45 | Antoine Palazzolo | Relecture TD2 par Antoine (#418) |
| 5ab34aa4 | 2023-10-04 14:54:20 | Kim A | Relecture Kim pandas & git (#416) |
| 154f09e4 | 2023-09-26 14:59:11 | Antoine Palazzolo | Des typos corrigées par Antoine (#411) |
| 3bdf3b06 | 2023-08-25 11:23:02 | Lino Galiana | Simplification de la structure 🤓 (#393) |
| 30823c40 | 2023-08-24 14:30:55 | Lino Galiana | Liens morts navbar (#392) |
| 2dbf8533 | 2023-07-05 11:21:40 | Lino Galiana | Add nice featured images (#368) |
| 34cc32c3 | 2022-10-14 22:05:47 | Lino Galiana | Relecture Git (#300) |
| f394b233 | 2022-10-13 14:32:05 | Lino Galiana | Dernieres modifs geopandas (#298) |
| f10815b5 | 2022-08-25 16:00:03 | Lino Galiana | Notebooks should now look more beautiful (#260) |
| 12965bac | 2022-05-25 15:53:27 | Lino Galiana | :launch: Bascule vers quarto (#226) |
| 9c71d6e7 | 2022-03-08 10:34:26 | Lino Galiana | Plus d’éléments sur S3 (#218) |
| 0e01c33f | 2021-11-10 12:09:22 | Lino Galiana | Relecture @antuki API+Webscraping + Git (#178) |
| f95b1749 | 2021-11-03 12:08:34 | Lino Galiana | Enrichi la section sur la gestion des dépendances (#175) |
| 9a3f7ad8 | 2021-10-31 18:36:25 | Lino Galiana | Nettoyage partie API + Git (#170) |
| 2f4d3905 | 2021-09-02 15:12:29 | Lino Galiana | Utilise un shortcode github (#131) |
| 4cdb759c | 2021-05-12 10:37:23 | Lino Galiana | :sparkles: :star2: Nouveau thème hugo :snake: :fire: (#105) |
| 7f9f97bc | 2021-04-30 21:44:04 | Lino Galiana | 🐳 + 🐍 New workflow (docker 🐳) and new dataset for modelization (2020 🇺🇸 elections) (#99) |
| 283e8e98 | 2020-10-02 18:54:30 | Lino Galiana | Première partie des exos git (#61) |
References
Arcep. 2019. “L’empreinte Carbone Du Numérique.” In Rapport de l’Arcep.
Footnotes
To find out whether you are eligible for the SSPCloud, you can click on this link and check the list of authorised domains.↩︎
More precisely,
Gitis a decentralised and asynchronous version control system. This means that, besides the fact that files are edited on local copies, there is no need to be continuously connected to the remote repository. You can make changes and submit them later.↩︎The collaborative
utilitRdocumentation (in French) explains why the HTTPS method should be preferred over the SSH method.↩︎As you can see, there are many different levels of rights. Your password actually has all these rights, which illustrates how dangerous it is if it is discovered, whether through an accidental disclosure or through someone malicious hacking it. Using a token makes your repository much safer since it cannot be deleted if the token has limited rights. Moreover, if the main branch is protected, which is the default behaviour of
Github, it will not be possible to destroy the repository history without a password.↩︎These exercises use the
quarto-git-sandboxextension. The terminal recognises a subset ofGitcommands (typehelpto see them) orLinuxcommands such asechoorcat.↩︎
Citation
BibTeX citation:
@book{galiana2025,
  author = {Galiana, Lino},
  title = {Python Pour La Data Science},
  date = {2025},
  url = {https://pythonds.linogaliana.fr/},
  doi = {10.5281/zenodo.8229676},
  langid = {en}
}
For attribution, please cite this work as:
Galiana, Lino. 2025. Python Pour La Data Science. https://doi.org/10.5281/zenodo.8229676.